Filter by security zone in RAMM Map & RAMM Grid
In this post we are going to walk through how filter by security zones, in the RAMM Map and RAMM Grid apps.
We will be using the TalkData security zone, one we created in earlier posts here and here.
As a quick recap on security zones, these define sets or groupings of roads in your network. These zones can reflect things like geographic areas (e.g. North area vs South area) or maintenance contract boundaries.
The Entire Network security zone is the default security zone included in all RAMM databases. This security zone contains every single road in the network. You can also setup new security zones in accordance with business and reporting needs.
Your user permissions in a given RAMM database may grant you access to multiple security zones. When using RAMM Map and RAMM Grid, it is possible to setup filters to see only the roads that are included in a particular security zone.
The Classic RAMM way to filter by security zones
This security zone filtering is not a new feature in RAMM. It has been around for a long time in Classic (legacy) RAMM. In fact you may already be familiar with how this works.
When connected to Classic RAMM you can click on the Database menu item in the top toolbar. In the drop down box that appears you can then choose the 'Change Security Zone' option.

This reconnects you to the database and presents a security zone selection screen (as shown below). All security zones which your user account has access to will be listed here. Simply select the security zone you want to connect to and click ok.

The roads you now see in the Classic RAMM app are restricted to those roads included in the selected security zone.
The RAMM Map / RAMM Grid way to filter by security zones
The same security zone filtering concept can be applied in RAMM Map and RAMM Grid. The menu option to do this, though arguably a little more hidden than Classic RAMM, effectively achieves the same outcome.
Follow along with the steps below to setup a security zone filter.
1. In RAMM map, click on the little road icon in the top left toolbar

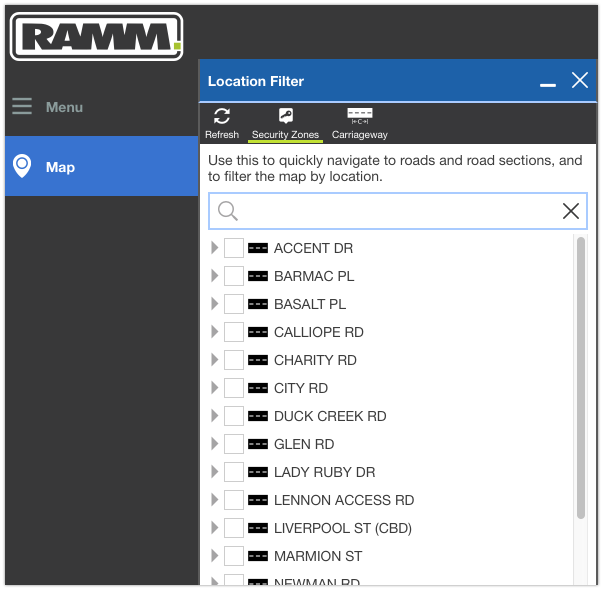
2. A Location Filter window will appear. At the top of this window, click the button which says Security Zones.

3. A Security Zones window will open to the right. This is equivalent to the Classic RAMM step of selecting the security zone you want from the drop down list. Simply tick the security zone you want to filter on and then click the Apply button.

4. The road list in the Location Filter window will refresh. This will only show the roads included in the selected security zone.
The selected filtering will then apply within the Map and Grid. The carriageways in the screenshot below for example, are only for roads in the TalkData security zone. You will also notice the road icon we clicked in step 1 has a little filter icon appended to it, to show there is active filtering in place.

So that wraps up how to filter on security zones in RAMM Map and RAMM Grid. This is a very useful function for RAMM Map & RAMM Grid, and is a continuation of a mainstay feature from Classic RAMM.